Here is a quick how-to and a few lessons learned when adding a maintenance clearance to equipment families. Sometimes these are missing from families that a provided by manufacturers or even out of the box with Revit.
1. Open the family and go to the Ref. Level plan view
2. Plan out where the maintenance clearance needs to be. For this family it will be on the right side where the pipe connections are.
3. Create the extrusion as a rectangle in this area. Don’t worry about the size just make it to the right of the pipe connections.
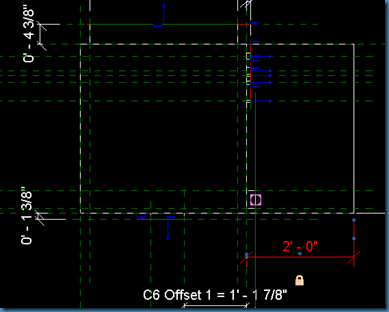
4. Align the extrusion to the reference planes on three sides. Lock these to the reference planes by clicking on the ‘pad lock’ that appears after you align each side. See arrows below for the three sizes to align.
5. Create an ‘aligned dimension’ from the left side reference plane (that the extrusion is aligned to) to the right side of the extrusion. Make this extrusion the desired width and click on the dimension and lock it. See image below.
6. Open the front elevation view and align the extrusion to the reference plane at the reference level and the reference plane at the top of the box. Be sure to lock these like step 4 above. See image below.
7. Test that the extrusion flexes properly when you change to difference types
8. Open the 3D View and change the Visual Style to realistic. All extrusions will show shaded grey.
9. Navigate to the manage tap and click on Object Styles
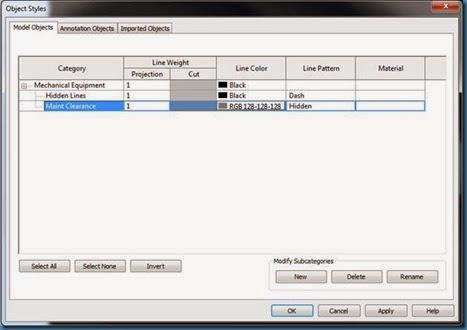
10. Create a new Subcategory and name it ‘Maint Clearance’. Keep this naming convention as consistent as you can. See image below for the line color and pattern.
11. Click on Create New Material and name it ‘Maint Clearance’.
12. Click on the material portion of the Maint Clearance Subcategory. The Material Browser will appear. Click on Create New Material and name it ‘Maint Clearance’.
13. Click on the Asset Browser (see image below) to open the material templates.
14. Select the Maint Clearance material you created and then go to the Asset Browser and search for Amber. With the Maint Clearance material selected double click on the Clear Amber material and it should apply it to the Maint Clearance you created.
15. Change the color of the Maint Clearance material to Red. Click ok to go back to the 3D view.
16. Click on the extrusion you created for the maintenance clearance. While this is selected go to the properties and change the Subcategory to Maint Clearance. The extrusion should now appear transparent red with a dashed outline.
17. Depending on how you wish to see the maintenance clearance you can set the visibility in the Visibility Settings for the extrusion. For example if you don’t want to see this on your plans that are set to medium detail only check the extrusion to appear in fine detail. That way you see it in working views only which should be set to fine detail.
NOTE: A solid extrusion is required rather than a void if you are exporting to Navisworks. A void will not work with collision detection.


